Monday, July 29, 2013

Creating Apache2 Virtualhost via Webmin

Here are some useful steps on creating Apache Virtualhost via Webmin... so that you don't have to create them via editing directly the apache2.conf / httpd.conf. Thanks to http://rimuhosting.com.
  • Go to your Webmin control panel.
  • Upgrade to the latest version of webmin (required if you are running a version older than 1.080, and normally advisable regardless).
  • Go to servers.
  • Go to Apache WebServer.
  • In the 'Create a New Virtual Server' section select "Any Address" (so you do not end up with a hard coded IP addresses in your conf file)
  • Enter 80 for Port (and select the last radio button).  This way the VirtualHost will co-exist with any SSL-enabled virtual hosts you add later on.  SSL-enabled VirtualHosts need to listen on port 443.
  • In the "Document Root" field enter where the virtual host HTML files will be.  For example, /home/vhostdomain.com/htdocs.
  • For "Server Name" enter the domain name for which you want to serve pages.  e.g. "vhostdomain.com"
After you have created the Virtual Host, there are a few other things you may wish to edit.
For example, click on the Virtual Host, and go to Networking and Addresses.  Enter an "Alternate virtual server names" of *.YourOtherDomain.com.  With this setting, your virtual host will serve pages for http://yourotherdomain.com/ as well as http://www.yourotherdomain.com/.
At this point you may also wish to set other options like "Log Files", so the log files for the Virtual Host end up in separate log file from the main server's log files.
To activate your changes, click "Apply Changes" on the main Apache Webmin page.
Of course, be sure to configure your DNS server so the virtual host domain name points to your server's IP address.
Webmin creates a VirtualHost directive in the Apache config file (/etc/httpd/conf/httpd.conf).  An example VirtualHost directive looks like this:


DocumentRoot /home/vhostdomain.com/htdocs
ServerName vhostdomain.com
ServerAlias *.vhostdomain.com

See http://httpd.apache.org/docs/2.2/vhosts/examples.html for some more VirtualHost examples.

Wednesday, July 24, 2013

Hardware of UbuntuEdge


The hardware specs folks!

The tentative specifications for it features high-end components, some rarely used in consumer mobiles.
  • ‘Multi-core CPU’
  • 4GB RAM
  • 128GB SSD
  • 4.5″ Sapphire Crystal screen (1280×720 HD resolution)
  • Dual cameras (8mp rear, 2mp front)
  • MHL connector (supporting HDMI)
  • Long-life silicon anode battery
  • Dual-LTE, NFC, Dual-band WiFi & Bluetooth 4
  • GPS, Barometer, Compass, Proximity Sensor, Gyro, etc
OS wise Ubuntu Edge, perhaps most surprisingly, will dual-boot Ubuntu Touch and Android. When docked it will be able to power a full Ubuntu desktop experience on an external monitor.

Tuesday, July 23, 2013

Ubuntu Edge Crowd Funder Passes $2 Million In Less than 12 Hours | OMG! Ubuntu!

Currently the amount is:  $3211447 (as I am writing this).

The Ubuntu Edge fundraiser has raised over $2 million in less than 12 hours.
Canonical’s crowd-funding campaign for a top-of-the-line Ubuntu ‘Super Phone‘ has attracted over 4000 backers so far. Between them they have pledged in excess of  total $2,000,000.
The milestone prompted Canonical CEO Jane Silber to comment: ‘I reckon that’s a crowdfunding record’.

$2 million down, $30 million to go

For Ubuntu Edge to become a reality the project needs to raise $32 million by August 21st. Should it fall short by just a single cent  Canonical will get nothing, backers won’t be charged, and no Ubuntu Edge phones will be produced.
Of the 4,000 or so backers nearly 3,500 have pledged $600 as part of Canonical’s one-day-only early-bird offer for an Ubuntu Edge phone.
After all 5,000 of these perks are sold (or the 24 hour window expires) future backers will need to pledge $830 or more to ‘pre-buy’ a device, pencilled in for release in May 2014.

Tier Options

  • $20 – Founder
  • $600 – Ubuntu Edge (first 24 hours/5000 only)
  • $830 –  Ubuntu Edge
  • $10,000 – One of the first 50 Ubuntu Edge handsets
  • $80,000 – Enterprise bundle incl. 100 Ubuntu Edge handsets

Tuesday, February 19, 2013

Solutions: The User Profile Service failed the logon error message

You receive a "The User Profile Service failed the logon” error message

Article ID: 947215 - View products that this article applies to.
System TipThis article applies to a different version of Windows than the one you are using. Content in this article may not be relevant to you. Visit the Windows XP Solution Center

Symptoms

When you log on to a Windows 7-based or a Windows Vista-based computer by using a temporary profile, you receive the following error message:
The User Profile Service failed the logon. User profile cannot be loaded.

Resolution

Occasionally, Windows might not read your user profile correctly, such as if your antivirus software is scanning your computer while you try to log on. Before you follow the methods here, try restarting your computer and logging on with your user account again to resolve the issue. If you restart your computer and it does not resolve this issue, use the following methods to resolve this issue.

Note You must be able to log on to an administrator account to fix your user profile or copy your data to a new account. Before you resolve the issue, log on to Windows by using another account that has administrative permissions, or restart in safe mode to log on with the built-in administrator account. For more information about how to start in safe mode, visit the following Microsoft website:

Method 1: Fix the user account profile

To fix the user account profile, follow these steps:

Important This section, method, or task contains steps that tell you how to modify the registry. However, serious problems might occur if you modify the registry incorrectly. Therefore, make sure that you follow these steps carefully. For added protection, back up the registry before you modify it. Then, you can restore the registry if a problem occurs. For more information about how to back up and restore the registry, click the following article number to view the article in the Microsoft Knowledge Base:
322756 How to back up and restore the registry in Windows How to back up and restore the registry in Windows
  1. Click Start, type regedit in the Search box, and then press ENTER.
  2. In Registry Editor, locate and then click the following registry subkey:
    HKEY_LOCAL_MACHINE\SOFTWARE\Microsoft\Windows NT\CurrentVersion\ProfileList
  3. In the navigation pane, locate the folder that begins with S-1-5 (SID key) followed by a long number.
  4. Click each S-1-5 folder, locate the ProfileImagePath entry in the details pane, and then double-click to make sure that this is the user account profile that has the error.

    • If you have two folders starting with S-1-5 followed by some long numbers and one of them ended with .bak, you have to rename the .bak folder. To do this, follow these steps:
      1. Right-click the folder without .bak, and then click Rename. Type .ba, and then press ENTER.
      2. Right-click the folder that is named .bak, and then click Rename. Remove .bak at the end of the folder name, and then press ENTER.
      3. Right-click the folder that is named .ba, and then click Rename. Change the .ba to .bak at the end of the folder name, and then press ENTER.
    • If you have only one folder starting with S-1-5 that is followed by long numbers and ends with .bak. Right-click the folder, and then click Rename. Remove .bak at the end of the folder name, and then press ENTER.
  5. Double-click the folder without .bak in the details pane, double-click RefCount, type 0, and then click OK.
  6. Click the folder without .bak, in the details pane, double-click State, type 0, and then click OK.
  7. Close Registry Editor.
  8. Restart the computer.
  9. Log on again with your account.

Method 2: Log on to Windows and copy your data to a new account

Create a new account and copy the data from the old account to the new account. For information about how to do this, visit one of the following Microsoft websites:

Windows 7
Windows Vista

Method 3: Delete the error SID and create a new profile

To delete the error SID and create a new profile, follow these steps:
  1. Delete the error SID.
    To have us fix this problem for you, go to the "Fix it for me" section. If you would rather fix it yourself, go to the "Let me fix it myself" section.

    Fix it for me

    To fix this problem automatically, click the Fix this problem link. Then click Run in the File Download dialog box, and follow the steps in this wizard.
    Fix this problem
    Microsoft Fix it 50446

    Notes
    • This wizard may be in English only, but the automatic fix also works for other language versions of Windows.
    • If you are not on the computer that has the problem, you can save the automatic fix to a flash drive or to a CD, and then you can run it on the computer that has the problem.

    Let me fix it myself

    Important This section, method, or task contains steps that tell you how to modify the registry. However, serious problems might occur if you modify the registry incorrectly. Therefore, make sure that you follow these steps carefully. For added protection, back up the registry before you modify it. Then, you can restore the registry if a problem occurs. For more information about how to back up and restore the registry, click the following article number to view the article in the Microsoft Knowledge Base:
    322756 How to back up and restore the registry in Windows
    To resolve this problem yourself, follow these steps:
    1. Delete the profile by using the Computer Properties dialog box. To do this, follow these steps:
      1. Click Start, right-click Computer, and then click Properties.
      2. Click Change settings.
      3. In the System Properties dialog box, click the Advanced tab.
      4. In the User Profiles area, click Settings.
      5. In the User Profiles dialog box, select the profile that you want to delete, click Delete, and then click OK.
    2. Click Start, type regedit in the Search box, and then press ENTER.
    3. Locate and then click the following registry subkey:
      HKEY_LOCAL_MACHINE\SOFTWARE\Microsoft\Windows NT\CurrentVersion\ProfileList
    4. Right-click the SID that you want to remove, and then click Delete.
  2. Log on to the computer and create a new profile.

Friday, January 25, 2013

One-Day Apple Shopping Event 2013 - 25 January 2013

Enjoy special pricing and free shipping on great gifts
for friends and family.

Wednesday, December 5, 2012

TeamViewer 8 – Complete Overview of What's New

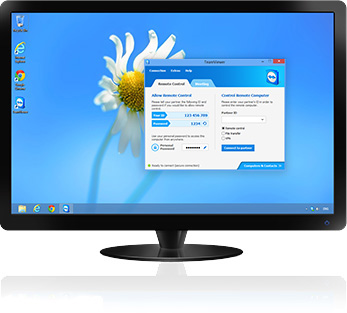
Finally, the no. 1 Remote Desktop Management System (I claim it to be no. 1 :P) is here with version 8!!! So what it got to offer???

Session handover with TeamViewer 8

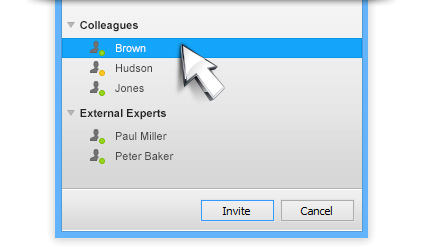
Session handover from one expert to another

Invite a colleague to an active remote control session to resolve a support case together. If necessary, you can hand over the session completely.

Comment on sessions for billing documentation

Enter your comments immediately after closing the remote control session. In your TeamViewer Management Console you will find all the information clearly documented, e.g. for billing. Platform-comprehensive for Windows, Mac, Linux, iOS, or Android.
Commenting
Group sharing

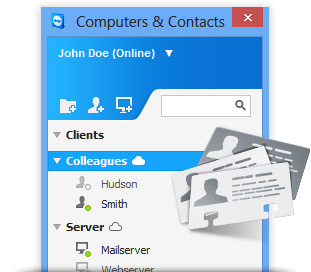
Share selected groups with other TeamViewer accounts

Do you provide service to your clients together with colleagues? Now it is easy to share individual groups on your computers & contacts list with the team, so that your colleagues have quick access on shared client computers. Read or write permissions can be set individually.

Visibly improved performance: faster, simpler, easier

Easy remote printing in your home office

Simply print out documents from remote computers on the printer next to you, e.g. while connecting to your office from home, without having to transfer files. You will always have all the important documents for a meeting or a client visit on hand, even if you have forgotten them at the office.
Remote printing
Planning meetings in Microsoft Outlook

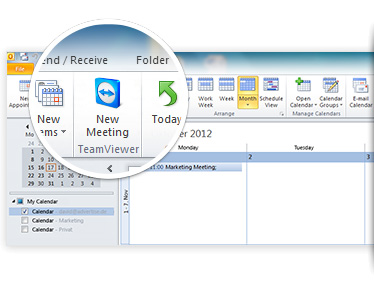
Schedule online meetings easily in Microsoft Outlook

Now you can plan your online meetings directly in your Outlook calendar via the integrated TeamViewer button. Briefly convert existing appointments into TeamViewer meetings and send the updated invitation conveniently with the necessary access information.

Session recording, including sound and video for perfect documentation

Record both, online meetings and remote control sessions, including sound, VoIP, and videos. Ideal for proofs and training in the near and distant future.
Session recording, incl. sound and video
More of what's new in TeamViewer 8

Remote sound and video

Hear and see what is happening on the remote computer, whether it is a system sound, music, or videos. You can now show your participants a video in real-time during an online presentation, depending on computer performance and internet connection.
Video transmission in real-time is only possible in licensed connections.

Remote account logout

View current logins to your TeamViewer account in the TeamViewer Management Console. Close them later if you happen to have forgotten to log out of your account when having worked on another device.

Automatically log out of operating systems after remote access

The remote computer is automatically locked instantly if the connection is closed or interrupted. This ensures that no one gains unintended access to the Mac or Windows computer you were just connected to.

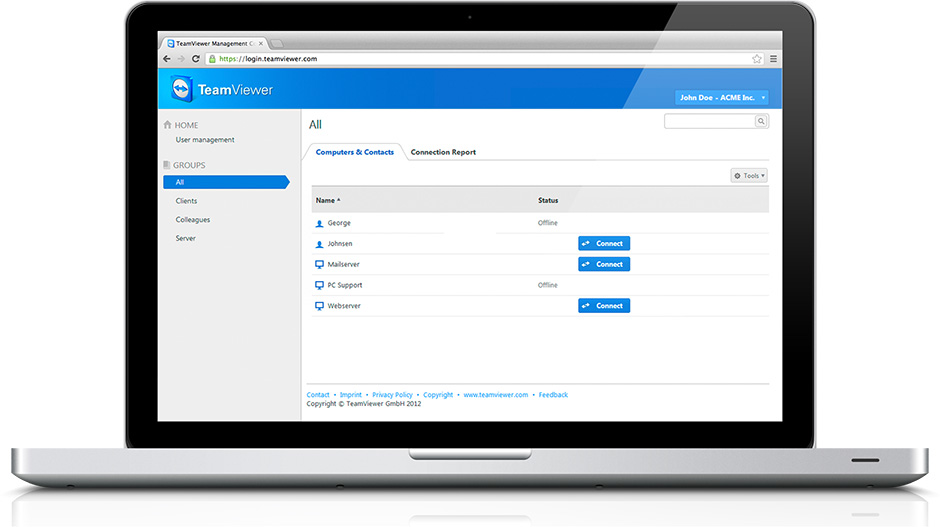
Completely new: The TeamViewer Management Console


  • web-based administration of your entire support team

  • integrated TeamViewer Web Connector

  • expanded TeamViewer Manager features


TeamViewer Management Console

Saturday, November 17, 2012

How To Edit Hosts File In Windows 7?

I know... I know... why would anyone do just that if not for some illegal stuff... well, there are hundred and one reasons (and maybe more) for people to edit the Windows Hosts file... AND in the Windows 7, there is a simple trick to bypass the annoying security thingy of not letting you edit that file (top secret I guess... :P)

So, without further a due... here it is...
  1. ClickStart ->All Programs -> Accessories.  
  2. Right-clickNotepad, and then click Run as administrator.  
  3. If you are prompted for an administrator password or for a confirmation, type the password, or clickAllow or Yes.
  4. Open the Hosts file (from the notepad you just opened) , make your changes, and then click File ->Save.
That's it. Simple huh?

Tuesday, July 17, 2012

Valve Officially Confirms Steam for Ubuntu 12.04 - Softpedia

A very good news from Steam... (Finally Can I install Ubuntu at my home pc to play Team Fotress 2 and DOTA 2???) The Valve Linux team announced last evening, July 16th, that they've selected the Ubuntu operating system to deploy their upcoming Steam client for Linux.  

The Linux team at Valve just created a few hours ago an official blog where they will publish everything there is to know about the Steam client for Linux, or more exactly Ubuntu.
Why Ubuntu? Simply because it is the number one Linux operating system out there, used by millions of users worldwide. However, there will be support for other Linux distributions as well!

"First, we’re just starting development and working with a single distribution is critical when you are experimenting, as we are. It reduces the variability of the testing space and makes early iteration easier and faster."

"Secondly, Ubuntu is a popular distribution and has recognition with the general gaming and developer communities. This doesn’t mean that Ubuntu will be the only distribution we support. Based on the success of our efforts around Ubuntu, we will look at supporting other distributions in the future." - was stated in the blog announcement.

It the upcoming months, Valve wants to unleash a fully-featured Steam client for the Ubuntu 12.04 LTS (Precise Pangolin) operating system, optimize the Left 4 Dead 2 game to run at a high frame rate with OpenGL, and, of course, to port other popular Valve game titles.

"We’ve made good progress this year and now have the Steam client running on Ubuntu with all major features available. We’re still giving attention and effort to minor features but it’s a good experience at the moment."

"In the near future, we will be setting up an internal beta focusing on the auto-update experience and compatibility testing. [...] Our goal is to have L4D2 performing under Linux as well as it performs under Windows." - said the Linux team at Valve.

Thursday, July 12, 2012

No Flash for Android 4.1, Jelly Bean, users | ZDNet

This story really is sad for me... too sad....

Some of you may be thinking that this isn't a big deal because Flash is supported in Chrome. This, after all, is how Adobe continues to semi-support Flash in Linux. Specifically, Adobe is working with Google on a single application programming interface (API) for hosting plug-ins within the browser. The API, code-named "Pepper", provides a layer between the plug-in and browser that abstracts away differences between browser and operating system implementations. Pepper is currently an experimental feature in Chrome. 

But, if you look closely you'll find that the "Pepper" implementation of Flash Player is only for the Chrome browser on x86/64 platforms. So, even though Chrome is Jelly Bean's default Web browser, Pepper isn't available on Android 4.1 and thus neither is Flash. 

So, can you just use an older version of Flash on your new Android 4.1 device? Adobe suggests that this wouldn't be a smart idea. “In many cases users of uncertified devices have been able to download the Flash Player from the Google Play Store, and in most cases it worked. However, with Android 4.1 this is no longer going to be the case, as we have not continued developing and testing Flash Player for this new version of Android and its available browser options. There will be no certified implementations of Flash Player for Android 4.1.” 

Looking ahead, Adobe will be blocking Flash runtime downloads. “Beginning August 15th we will use the configuration settings in the Google Play Store to limit continued access to Flash Player updates to only those devices that have Flash Player already installed. Devices that do not have Flash Player already installed are increasingly likely to be incompatible with Flash Player and will no longer be able to install it from the Google Play Store after August 15th.”
Just because Adobe says it doesn't work and won't support it doesn't mean that the existing Flash Player won't work on Android 4.1-powered smartphones and tablets. Some users are already successfully running Flash on their Jelly Bean devices. In the future, they expect they'll just sideload it on their devices. But, as one developer pointed out, “Sooner or later, Adobe Flash Player will break.” 

Reading Adobe documentation it's clear that Adobe is betting its future on Windows and Macs. There's no Flash for iOS, Flash will gradually die off on Android, and Adobe has no publicly announced plans to bring Flash to either Windows Phone 8 or Windows RT. For better or worse, Adobe has decided that Flash won't be playing a role on most mobile devices.